

Monday, January 25, 2016
HOW TO CURE THE WINTER BLUES FOR YOUR NAILS
Wintertime wreaks havoc on my nails and hands. The dry skin, cracks and peeling just make me want to hide them in gloves all winter. I've been on a mission to find products that will actually work and I think I've finally found some good ones I wanted to share with you because they actually seem to be working.
1. I was reading great reviews about this deborah lippman cuticle remover and since I love the nail polish, I knew I had to give it a try. It's on the pricier side so I tested it in Sephora to see if it actually did the trick. Fine minutes later I went back and bought it because it's that good.
2. Crystal Nail files are great because you can wash them and they last for years. They're also gentle on brittle nails.
3. One of my friends recently shared with me that she uses argan oil on her nails. I use it for everything else but never thought to use it on my nails. I've been rubbing my favorite argan oil into my cuticles and nails every night before bed then on my hands as well. I love this one by Carefree Organics.
4. Yes, I buy vitamins because they look pretty. Same as my wine. But these actually do work, for my nails at least. I ran out of them and my nails started to get brittle so I ran back to the store to stock up and a couple weeks later they were back to normal.
5. Who doesn't love having the perfect manicure all the time? But it's not always realistic. That's why I love this naked nail polish by Zoya. Added benefit Zoya nail polishes are listed as one of the safer brands to use on your nails.
6. If I do manage to paint my nails I have to use this Essie gel setter as my top coat. It makes a manicure last a lot longer and helps brittle nails in the winter!
7. I have one of these Ever Skincare Light Beam Handcreams on my nightstand and one in my car. It's lightweight, has an SPF, lightens dark spots, exfoliates and hydrates! Everything you want all in one tube!

Saturday, January 23, 2016
DESIGN CHALLENGE - KIDS ROOM
Even as designers we get stumped on certain rooms. Usually our own! My challenge has been one of my sons rooms. The red wallpaper was already here and I sort of like it. It reminds me of a little Nantucket village which goes along with my sons nautical theme bedroom. Excuse the awful photos.


 (Still have to paint trim)
Unfortunately, he inherited my awful sleep issues and hasn't slept in his room for quite some time because of the nightmares. To get him excited about his room again I thought about doing a little makeover. Two of the walls were painted red and two are wallpapered. I painted the red ones a light gray hoping it would calm down the room a bit. He slept in his bed for maybe a week.
After getting my hopes up that it was a quick fix I got to thinking that maybe the room needs a complete overhaul. He is turning 7 next week (sniff sniff) so maybe it's time for a bigger boy room anyway. Although I don't love this room, I'm not sure I'm ready to let go of a little boys bedroom just yet. But at the same time I would like him to sleep in his bed and not a crib mattress on our bedroom floor. (Crazy, right?!) but I know what he's going through so I stopped fighting it.
My design dilemma is if I keep the vintage Nantucket wallpaper or get rid of it and start fresh? I think I know the answer to my own question but sometimes I need to talk out loud. Hear other opinions and then come to a decision.
The room needs a couple new things to complete it but I ask myself if it's worth it to complete a room no one sleeps in. He does play in here and keeps it very tidy but it's just the sleeping part we need to get over.
What would you do?
1. Finish this one (new rug, light fixture)
2. Start fresh
Thursday, January 21, 2016
FRIDAY FINDS - GIRLS ROOMS
I'm currently in all my girly-ness glory, designing bedrooms for some fun little clients. Living as a "boy mom" I enjoy every second I get to look at pink stuff. I hate to admit it but most of the time I don't even look at the girl stuff, except for this month. I've been getting lost sourcing inspiration for my girls rooms. Kids rooms are one of my favorite things to design. Girls rooms are probably my most favorite and it's been that way since I'm 6 years old. If you happen to have a girl wanting to update her bedroom, here are some of the cutest rooms I've found.
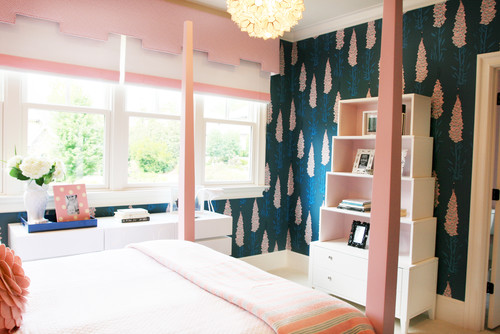
Navy and Pink just says preppy all over it. I love this graphic wallpaper and that pink poster bed....SOOO CUTE! How adores is that little bookcase too?!
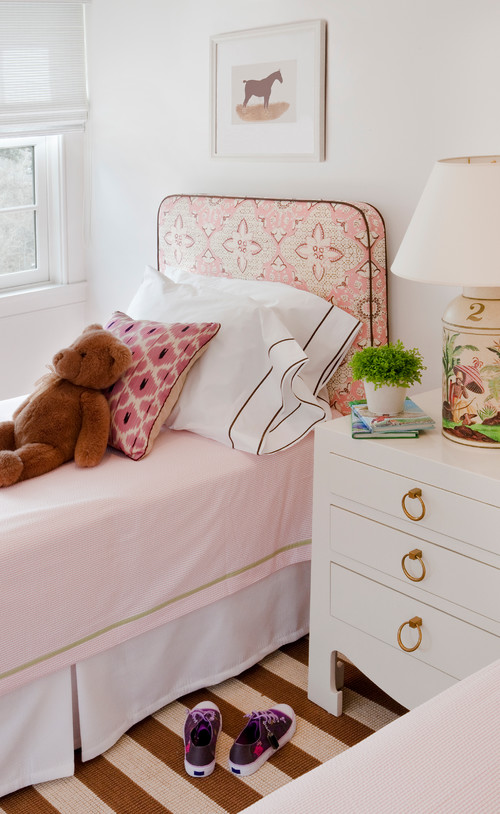
I like the soft feminine feel of this room without being too over the top with pink.
Girls rooms don't have to be all pink, frills and bows. This is a popular color with my little clients and a room that will grow with them. Perfect Tween room by Costa Mesa Interior Designers! I would have died to have that bed when I was younger.

Here's another great example of a room that can grow with your child by J&J Design Group.
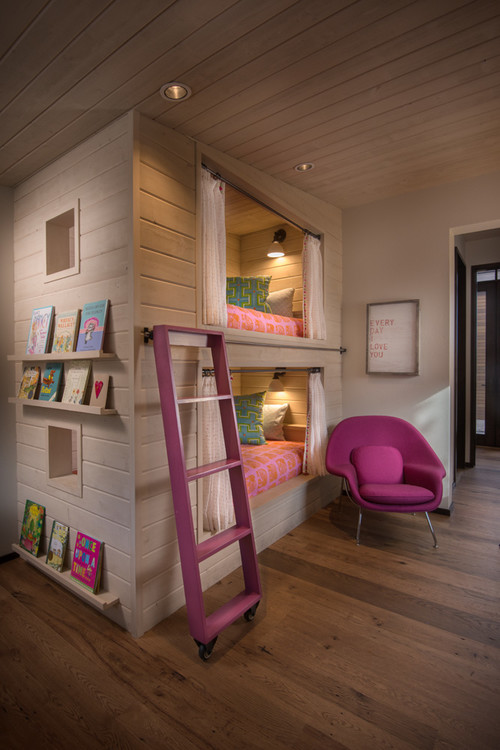
Can you say coolest kid on the block? Actually can I get a bed with curtains so no one can bother me? Jennifer Hoey Interior Design did an awesome job with this design.


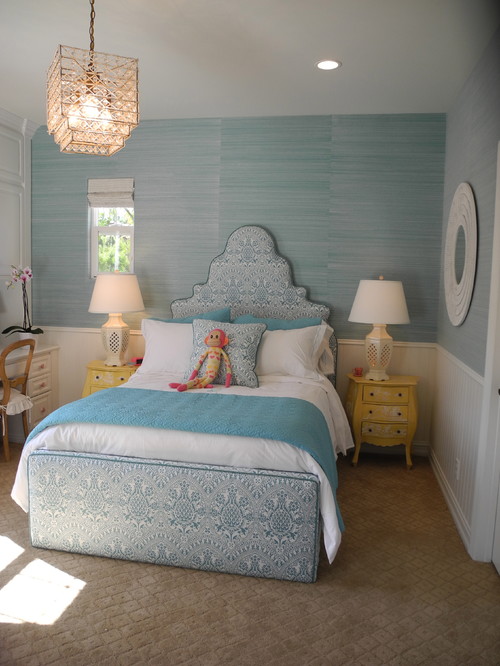
I have had this bedroom saved forever. Maybe it's because I always wanted a daybed and never got one but I love the custom built bed with the upholstered headboard.

and how AHHH-MAZING is this Tween Room!! I want to use this wallpaper somewhere so badly.

I've always loved looking at the PB bedding catalogs. Whoever makes their beds can you come and make mine everyday? This is my favorite of the girls bedding options right now. I'm a sucker for aqua/mint.
Shop my girls bedroom picks here:

Sunday, January 10, 2016
OUR KITCHEN RENOVATION
I've been waiting forever to share the final pictures from our kitchen renovation with all of you. It's been complete for awhile and we are so happy with how it turned out. Doing a renovation during a record breaking winter was a bit rough. Being stuck inside with kids and no kitchen takes on a whole different meaning of survival. But we made it and it was so worth it! I'm so lucky to have a great friend like Jess at Jessica Delaney Photography who photographed our kitchen and to have it featured in the Boston Globe yesterday. Thank you Marni for writing up a great article and making me laugh through my month of kids sickness. Marni also has a great style blog you should check out Style Carrot.

Here's a little recap of our renovation. We began last year in what was to be a little "face lift" to get us to the big renovation. When we realized that the big renovation was more like adding an additional house onto our current house, we decided to make the "face lift" a little more permanent. We knew going into this that it wouldn't be our forever kitchen but that we would be living with it for awhile. Making it something that we loved and was functional for our family was our top priority. Our house is a center entrance colonial and I wanted to keep some traditional with modern touches. We like having a formal dining room, so the option to take down the wall between the dining room and kitchen was out and we were left to work with the footprint we had, which was a wide galley kitchen. Not wide enough to add an island but wide enough to incorporate a seating area. The kitchen is the heart of the home no matter how big or small, so I wanted a place to gather. I still laugh when I think back, trying to block people out of my outdated kitchen but everyone still managed to sneak in there.
My husband, a type A planner and myself, an ADHD creative thinker got to work. There are times our personalities really fit well together and this happen to be one of them. Except he thinks out loud (he's italian, he can't help it) and I think in my head. I don't know how many times I've said I wish my brain had a print option. We must have gone through 10 different layouts before deciding on the one. There were certain items in the kitchen I didn't want to cut costs on and others I was ok with choosing the budget friendly option. After seeing CliqStudio cabinets in a neighbors home and comparing costs and quality, these were the cabinets we chose. Custom cabinets without the custom price tag. I can't say enough positive things about working with them. Our designer, Amy was very patient with me as I emailed her weekly, changing something within the layout. We chose the white Dayton style cabinets and painted the pantry cabinets on our own. They do have different cabinet color options available.


I went back and forth on the countertop options and maybe lost some sleep over it. I'm a messy cook and my husband is very (how do I want to say this...) anal. He notices EVERYTHING! But in the end my heart was set on marble and I knew I'd always be thinking about it if I didn't choose it. I'm so glad I decided to go for it because it's stunning and I've found great tricks for keeping it looking great.

One thing I did know for certain was that I was going to use this Hicks pendant above the seating area, the Schoolhouse Electric brass sconces above each window, the champagne brass Delta faucet and the Cole & Son's Hexagon wallpaper.


For the flooring I had always loved the look of dark hardwood floors with white cabinetry but when the demo was done the original wood flooring was damaged beyond repair. I had to rethink my options and think practical (which is not my thing) and go for durability especially since it leads in from our mudroom and back door where many dirty little wet feet come into the house. The slate tile we chose is now probably one of my favorite things in our kitchen.

For the backsplash tile I knew I wanted a simple white subway tile with a platinum grout. My heart was also set on the charcoal Heritage Bertazzoni range and hood, but with it being double the cost we decided to go with the stainless and use the heritage hood to tie in the black in the kitchen. Nervous about how this combo would look together (of course it was the last thing to arrive and be installed) we're really happy with how it all came together. We both love to cook so we couldn't wait to have a nice range to do so.

As for the other appliances, we had purchased a Bosch dishwasher when we moved in knowing that we would be renovating down the line. This is hands down the best dishwasher I have ever owned. The matching counter depth side by side fridge and the microwave/oven combo unit for the wall are also Bosch. We used our toaster oven A LOT but wanted to keep the countertop free of clutter. I'm so glad my husband convinced me to pull the trigger. Space saver and an extra oven!


For the seating area we wanted to create a family friendly space that could also serve as a work station/island. A custom bench was made with a faux leather cushion. Perfect for messy kids. After searching and searching for the perfect table and not finding exactly what I envisioned, my husband made a temporary table with the remaining butcher block and it's worked quite nicely. The same butcher block was also used for the floating shelves. I had eyed these Serena & Lily stools up for a long time and was like a giddy school girl the day they arrived. Bonus: they're really comfy!


Next to the seating area is what we call our cubbies. This was not in the original design but when a kitchen is demo'd you learn that not everything can be the way you envisioned. Previously a broom closet that we hoped to keep but move the door to the other side of the wall. Unfortunately, it couldn't be done and it was space I didn't want to waste. I wanted cabinets with doors and my husband wanted a wine fridge. I'm sort of glad he won this one because with our fridge being counter depth it's nice to be able to store wine, beer and kids drinks somewhere else. Win win!

and here is the Before and After
BEFORE:


AFTER:

Sources:
Design- Jennifer Cavorsi Design
Cabinetry- CliqStudios
Countertop- Calcutta Carrera Marble MSI Boston
Flooring- MS International Slate Home Depot
Brass Hardware- Lews Hardware Collection
Stools- Serena & Lily Riviera Stools
Faucet- Delta Champagne
Wall sconces- Schoolhouse Electric
Pendant Light- Visual Comfort
Bertazzoni Range and hood- 36" Range Heritage Series Hood
Pantry Cabinet Color- Benjamin Moore Cape May Cobblestone
Woods Wallpaper- Cole & Sons

Thursday, January 7, 2016
PATTERN PLAY
Patterned tiles have been trending for awhile now and I personally love how they completely transform a space. From bold colors, to black and white, I've included beautiful inspiration kitchens below for you to browse. I've also included some of my personal favorite choices for kitchen tile.


Tuesday, January 5, 2016
OUT WITH THE OLD, IN WITH THE NEW
Happy New Year! A fresh start, new resolutions, new goals and our own 365 page book just ready to be written. Time to make it a good one!
I have a couple resolutions on my list but I decided to take a little tip I read last year and apply it to mine this year. I'm doing monthly resolutions because did you know it takes 27 days of doing something for it to become routine? Interesting, huh? Before I can tackle any of these I need to come up with a plan to make it actually stick. Because I know myself too well and 2 days in I'll get sidetracked (which isn't hard to do) and I'll forget about what It was I needed to be doing. In order to achieve a goal you need a plan and a planner. I'm a big paper girl. Always eyeing up new notebooks, planners, stationary so I've tried a few of these planners and wanted to share them with you if you're in the market for one. Remember: You have to find a system that works for YOU! If you're not using it everyday then most likely you're not going to. Move on to something that will better suit you. For me I realized I needed a daily schedule with a to do list. I actually switched my planners half way through the year because I found one that had just that and it worked better for what I needed to accomplish. Some prefer a wall calendar, some are all paperless but whatever it is you do there are a lot of great options out there.
My first "real" planner was Erin Condren's Life Planner. These are so fun! I had pictures of my family all over it which made me smile everyday. There are add in's and even FB groups where everyone shares how theirs looks. This is when I realized that I probably had the most boring looking planner. Or maybe mine would have looked like that before kids. I will never know. This planner is great for keeping at home, it's a little big to tote around.

The second planner I had was a Plum Paper planner that I found on etsy. Less expensive then the other one and I was able to customize it to my needs. I created a column for my husband and the kids. meal plan column and work "to do" column. This was when I was working part time and managing more home and kid stuff. I really liked that each family member was separate so I knew who needed to be where and when, if my husband was traveling and if I need a sitter, etc. You can customize yours many different ways to suit your needs. This held up really well too and there is a back pocket too.

Since I am always up for trying new things I order yet a different planner the following year. I ordered a Lotus Paper Co planner. Very similar in size to the Erin Condren and Plum Paper but it had a hard cover which I liked along with the elastic band to hold everything inside. You can choose your page layouts and I chose the one with the to do list in the middle because ADHD people need to do lists everywhere or else we don't know what to do. Great multitasking pages to keep on top of daily activities. This planner works well for those who need to see everything that is going on that day. This was definitely the most durable out of the 3.


My current planner happens to the be cheapest one and the one that finally fits me the best. I was drawn to the black and white stripes in Target and when I opened it up I fell in love. The days are listed by time and since I get very easily distracted I liked that I could plan out my day. It is also helpful in seeing how productive I was as well. There is a to do list, an email/call section and next week section so you can have a look ahead. It's bigger but thinner then the ones above so it's easier for me to put in my work bag but have started leaving it on my desk and carry around my May Designs weekly planner.


These little May Designs books pack a lot of punch for me. They keep me on track. There are now more options for inside. I just ordered a new one and haven't yet decided if I like it better then the weekly pages option. They're durable and small and I can keep it in my purse. I copy things needed from my regular planner as well as my informant app on my phone. Yes, I'm not all paper. I still don't trust any electronic scheduling app since I've lost way too many appointments.


and if you like having a wall hanging calendar there are some great options for those as well


What are some of your favorite planners? And do you use more then one calendar? Or am I just crazy?
Subscribe to:
Posts (Atom)

